Contact website to arrange submission email access
HOW TO USE THIS QUEST
This iQuest has been designed to deliver both information and assessment tools suitable for a multi-week unit of inquiry on forensic science. It includes information on forensic science and forensic specialists, the techniques for processing a crime scene and the gathering of evidence. Students will learn about and use some of the methods used by modern forensic scientists to gather evidence and solve crimes. Lessons and activities cover the key areas and specialities of forensic science to gauge student learning and understanding.
The lessons and activities themselves are designed to be done in any order during the unit, making them flexible to allow for time and material requirements. The lessons and activities are designed to be teacher led, but extension opportunities exist for student led investigations.
Each lesson has teacher’s notes that are detailed on this page, they include a lesson outline, intended learning outcomes, and evidence of assessment that will be available at the completion of the lesson. Also included are lists of required materials, advice on catering for inclusion, and so possible extension activities and a list of additional websites.
Assessment is via two methods: electronic and evidence based. Electronic assessment involves students filling out and submitting forms and surveys at the end of various lessons throughout the quest. Evidence based assessment is detailed in each lesson outline, and includes results of scientific experiments, written examples of student work and presentations.
why teach forensics
Educators have observed that forensic activities have resulted in students' increased engagement in science activity (Colgan, 2002; Learner, 2003) and enthusiasm for science (Colgan, 2002; Murk, 1986). Forensic activities have helped students think critically like scientists by analysing the world around them (Dickie & Percival, 1986).
KEY LEARNING
Students will develop a deeper understanding of what forensic science is, and how it is used to solve crimes.
INSPIRED BY HOWARD GARDNER
I want my children to understand the world, but not just because the world is fascinating and the human mind is curious. I want them to understand it so that they will be positioned to make it a better place. Knowledge is not the same as morality, but we need to understand if we are to avoid past mistakes and move in productive directions. An important part of that understanding is knowing who we are and what we can do ... . Ultimately, we must synthesise our understandings for ourselves. (Howard Gardner 1999: 180-181)
READ MORE ... CLICK HERE
ASSESSMENT DEVELOPED USING BLOOMS TAXONOMY
LESSONS AND ACTIVITIES HAVE BEEN DEVELOPED WITH EDWARD DE BONO'S SIX THINKING HATS IN MIND. SEE YouTube BELOW
YOUTUBE NOTES
ESL students can access subtitles in their preferred language by pressing PLAY, then the CC button and select TRANSLATE CAPTION.
ESL students can access subtitles in their preferred language by pressing PLAY, then the CC button and select TRANSLATE CAPTION.
AUSVELS AND VELS UNIT REFERENCES
THE ENTIRE FORENSIC UNIT INTENTION
The following lessons have been developed to appeal to Level 4 students by capitalising on their fascination for CSI type TV programs. This Forensic Science Unit explores a range of related activities. These activities have multimodal facets related to many curriculum areas.
WHY TEACH FORENSICS
Forensic science is the application of scientific knowledge to solve legal problems (Dillon, 1999). Educators have observed that forensic activities have resulted in students' increased engagement in science activity (Colgan, 2002, Learner, 2003) and enthusiasm for science (Colgan, 2002, Murk, 1986). Forensic activities have helped students to think critically like scientists by analysing the world around them (Dickie & Percival, 1986).
LEARNING FORENSICS THROUGH LITERACY AND INQUIRY
OBJECTIVES
Teachers' who would like to respond to their students' out-of-school interests. The unit is structured to be inquiry based and incorporate a range of texts to aid students in becoming scientific, mathematical, logical, global ... thinkers. Recognising that individuals both form and represent their ideas through language (Vygotsky, 1978), The designed activities provided opportunities for reading, writing, and discussing scientific concepts. It is the developers intention that students' experience how scientists read, write, and talk science in the process of scientific inquiry (Lemke, 2004). We have designed the forensics unit to develop students' problem solving and inquiry skills and to foster students' learning of scientific concepts through the use of real-life situations.
To increase students' ability to analyse, evaluate, and communicate scientifically, the inquiry-based unit incorporates a variety of literacy activities. These activities include reading and solving crime scenes, writing about forensic evidence (e.g., fingerprinting, blood spatter patterns), and reading and discussing forensic-related webpages and print texts. To capitalise on the social nature of adolescents, these activities can be done with partners or in small groups to address student-generated questions.
Co-operative literacy activities correct students' mis-impressions that science is a solitary and competitive endeavour (Koke, 2005). The activities also demonstrate to students that scientists use language and literacy to discover and record their ideas. The unit emphasised the literacy-science connection and responds to the call for literacy and science to be taught together (Saul, 2004). These co-operative language arts activities capitalised on the learning styles and preferences of girls who tend to prefer collaboration but are often marginalised by boys in science instruction (AAUW Educational Foundation, 2000; Koke, 2005).
The primary goal is to develop students' inquiry skills through critical thinking and reading. To accomplish this goal, we first constructed a forensic curriculum map to direct the lesson plans and activities for each day towards achieving knowledge, skills and or outcomes for that lesson.
The first lessons addresses two standards: (1) formulate predictions, questions, or hypotheses based on observations and evaluate scientific evidence for relevance to a given problem and (2) predict the outcome of an investigation based on prior evidence, probability, and/or modelling.
We have designed the lessons by using a variety of forensic science books, such as news articles, webpages, trade books, and journal articles, and have incorporated readings and activities taken from forensics lesson plans posted on the Internet by other teachers, like those described at The Science Spot (ScienceSpot.net/Pages/classforsci.html).
The entire unit begins by assessing students' prior knowledge of forensics through a pretest. The pretest focuses on determining students' knowledge of forensics vocabulary or concepts and forensic procedures. We also assess students' interests in and knowledge of forensics by using a modified K-W-L activity, a chart that students complete that typically lists what they know, what they want to know, and what they learned about a topic (Ogle, 1986). The students list everything they knew about forensic science, everything they wanted to learn about forensics, and everything they wanted to be able to do after learning about forensics.
We hope that these online submissions show that most of the students want to learn about the various types of evidence found at crime scenes, particularly fingerprinting, and that they want to be able to use evidence to solve crimes. Their responses might include the following:
"I want to learn how to fingerprint and determine things by looking at fingerprints."
"I want to know-is there a different fingerprint for every person?"
"I want to know how forensic scientists perform labs."
Comments that addressed what students wanted to be able to do at the end of the unit included the following:
"I want to be able to do forensics labs."
"I want to be able to do the methods forensic scientists use to solve crimes."
"I want to work like a CSI."
ACTIVITIES
To meet these goals, we have included activities that would allow students to develop forensics skills, concepts and procedures in relevant ways. For example, students practice and gain proficiency with inquiry skills by analysing photos related to criminals, victims and crime scenes by writing their own explanations of what they see and think. All images and activities were taken from the Internet via Google Images and individual websites and from lesson plans done by teachers at other schools or from commercial sources such as the Homeschool Learning Network (www.homeschoollearning.com). Students also practice their inquiry skills by reading a list of clues, writing a story to explain the crime depicted by the clues, and identifying a suspect. Crime sequencing activities in which students read and order a list of events in a murder give students practice in understanding and organising evidence to solve crimes.
Students also research and read stories taken from history as their homework which could include those posted by BTN, TruTV (www.trutv.com/forensics_curriculum) and the Shodor Education Foundation (www.shodor.org/succeed-1.0/forensic), which challenge them to understand crimes by using inductive and deductive reasoning. Students discuss their tentative solutions with one another and write their ideas about what happened. These activities promoted a type of higher order thinking used daily by forensic scientists that requires analysis, deductive thinking, and reasoning (Colgan, 2002).
Students participating in the unit use a variety of forensic techniques, including teeth impressions, fingerprinting, foot printing, blood spatter projections, handwriting analysis, footprint analysis, metric analysis, and powder analysis. They use these methods to explore the two major types of evidence found at a crime scene, physical and chemical. Students distinguish between various types of evidence.
We believe that students' enjoy activities like taking their own fingerprints and comparing them to the three basic types of fingerprints: the arch, the whorl, and the loop-clues that scientists use to determine suspects in a crime. Students compare their own prints to those basic types and to the variations of those types that were classified on a handout. This is a popular activity because of forensics television programs that students watch which often shows fingerprint evidence. Students also practice their inquiry skills by analysing others prints.
Students follow written directions to take their own dental impressions by biting on Styrofoam (Wise, 1996). They will answer literal and inferential questions about their teeth impressions, such as (a) How many teeth marks are in the top and bottom impressions? (b) What features of the impressions are useful in telling the top teeth from the bottom teeth? (c) How are the teeth different? They study a diagram of the molars, premolars, canines, and incisors and their locations. Students read that forensic scientists can compare teeth impressions to dental records to identify victims and learned that dental impressions are used 80% of the time to identify unknown victims.
To assess the impact of the unit we designed an open ended questionnaire to be completed at the end.
blooms inspired questions for teachers
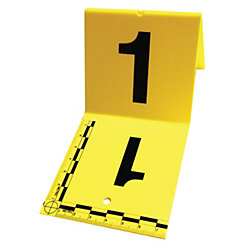
FOOT PRINT
What can result if the plaster is not mixed properly?
SHOE IMPRESSION
How can you show which shoe made the mystery impression?
Can you identify the differences between your shoe imprint and the mystery print?
FINGERPRINT
How can you prove that a specific person left a finger print?
How can you organise your data to display your results?
List as many characteristics of your fingerprints as you can.
MEET THE TEAM
What do you think each of these specialists do?
Can you recall all of the specialists mentioned in this activity?
HAIR AND FIBRE
What data did you use to make your conclusions?
CRIME & PUNISHMENT
What is the main idea of this activity?
What judgement can you make about what crimes these people could have committed?
BITE MARKS
What evidence can you find to discover who left the bite marks in the food?
SEE THINK WONDER
What conclusions can you make by looking at this picture?
GLOSSARY
Can you suggest any other terms that should be in the glossary?
CHALK OUTLINE
Describe in your own words how you would go about measuring the perimeter of a chalk outline?
Can you suggest an alternative method?
BLOOD SPLATTER
How could you determine the direction that a suspect was moving through a scene based on the blood evidence?
What inferences could you make based on the shape of any blood drops found at a scene?
RANSOM NOTE
Apply what you have learned to write a ransom note and print it using one of the given websites.
What is the main information that needs to be included in a ransom note?
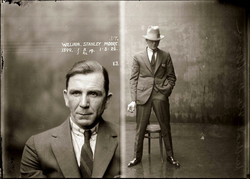
MUGSHOTS
Can you identify the main forms of information that should be displayed on a mugshot card? Illustrate these using a mind map.
PROFILING LESSON
What is the relationship between height and foot length? Explain in your own words.
CODE BREAKING
Design a code, encode a message and have another student decode it.
What is the difference between a suspect and a criminal?
ROBBERY
Can you invent a suitable method of collecting evidence?
Can you solve the robbery using what you have learned?
Invent a system to protect and an item to collect evidence.
What can result if the plaster is not mixed properly?
SHOE IMPRESSION
How can you show which shoe made the mystery impression?
Can you identify the differences between your shoe imprint and the mystery print?
FINGERPRINT
How can you prove that a specific person left a finger print?
How can you organise your data to display your results?
List as many characteristics of your fingerprints as you can.
MEET THE TEAM
What do you think each of these specialists do?
Can you recall all of the specialists mentioned in this activity?
HAIR AND FIBRE
What data did you use to make your conclusions?
CRIME & PUNISHMENT
What is the main idea of this activity?
What judgement can you make about what crimes these people could have committed?
BITE MARKS
What evidence can you find to discover who left the bite marks in the food?
SEE THINK WONDER
What conclusions can you make by looking at this picture?
GLOSSARY
Can you suggest any other terms that should be in the glossary?
CHALK OUTLINE
Describe in your own words how you would go about measuring the perimeter of a chalk outline?
Can you suggest an alternative method?
BLOOD SPLATTER
How could you determine the direction that a suspect was moving through a scene based on the blood evidence?
What inferences could you make based on the shape of any blood drops found at a scene?
RANSOM NOTE
Apply what you have learned to write a ransom note and print it using one of the given websites.
What is the main information that needs to be included in a ransom note?
MUGSHOTS
Can you identify the main forms of information that should be displayed on a mugshot card? Illustrate these using a mind map.
PROFILING LESSON
What is the relationship between height and foot length? Explain in your own words.
CODE BREAKING
Design a code, encode a message and have another student decode it.
What is the difference between a suspect and a criminal?
ROBBERY
Can you invent a suitable method of collecting evidence?
Can you solve the robbery using what you have learned?
Invent a system to protect and an item to collect evidence.
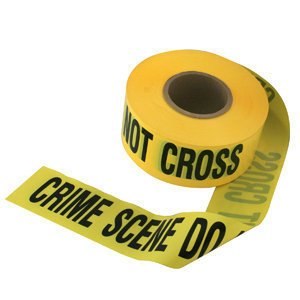
preserve the learning scene
Whilst the students learn about forensics you could consider taping off the scene to add to engagement of the topic. If there are any specific students you feel need extra focus place markers around them.
MATERIALS
Yellow and Black tape can be purchased from hardware stores.
Markers
MATERIALS
Yellow and Black tape can be purchased from hardware stores.
Markers
Excursion to the Victoria Police Forensic Museum
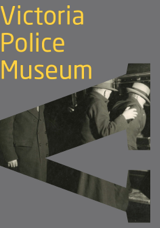
At some point during this unit of inquiry the class could undertake an excursion to the Victoria Police Forensic Museum. This will give students the opportunity to see up close some of the forensic history of Victoria, and to participate in a lecture and an activity that showcases their skills and knowledge of collecting evidence and making predictions to help solve a crime!
Contact the museum between 10am and 5pm, Monday to Friday to book your class excursion.
Phone: (03) 9247 5214
Email: [email protected]
By mail to:
Victoria Police Museum
GPO BOX 913
DOCKLANDS VIC 3008
Contact the museum between 10am and 5pm, Monday to Friday to book your class excursion.
Phone: (03) 9247 5214
Email: [email protected]
By mail to:
Victoria Police Museum
GPO BOX 913
DOCKLANDS VIC 3008
individual RESEARCH PROJECT - class presentation
As an on-going homework project during this unit of inquiry you will select a famous crime from recent history. You will then research the circumstances of the crime, and then you will be allocated a time deliver a short 5 minute presentation for the class.
As part of your studies of Civics and Citizenship you may select a crime that has shocked our world and affected the way we live our lives. You will need to have your selection approved by your teacher for suitability, and you will each need to select a different subject.
Your research should include:
Name, date and location of the crime.
Names of the criminals and the victims.
A summary of the events that led up to the crime, and the aftermath.
Any effects that this crime has had on the way people now live their lives.
As this is a unit on forensics you should also try to include reference to any forensic evidence that is involved with the case.
The presentation will be delivered in-front of the class, and should last for at least 5 minutes. Use of Power Point is encouraged to help with visual aspects of the presentation. The presentations will take place at several times during the unit. A roster of presentation times will be on display, and you will be expected to be ready to present when your allocated time arrives.
prior knowledge test
At the beginning of the unit have the students complete and submit the Prior Knowledge Test via the Introduction page.
This lesson is intended to establish any prior knowledge that the students have around the topic of Forensic Science. It will also serve as a time for students to record any questions that they have and would like answered. These questions can be revisited at the end of the unit as a method of assessing learning.
This lesson is intended to establish any prior knowledge that the students have around the topic of Forensic Science. It will also serve as a time for students to record any questions that they have and would like answered. These questions can be revisited at the end of the unit as a method of assessing learning.
forensic specialist lesson

LEARNING INTENTION
Students will use prior knowledge to make predictions about the role of each specialist based on the job title alone. They will then use research skills to find the full definition of each of the specialists, and record their findings electronically.
Ballistics Expert - The main duty of the ballistics expert is to analyse guns and weapons that may have been used to commit crimes. They may fire test shots from a certain weapon in order to compare bullet fragments or shell casings. They also may present ballistic evidence and their findings in court as an expert witness.
Toxicologist - Toxicologists research and assess the effects of chemicals on a person or the environment, and perform carefully designed studies and experiments. Forensic toxicologists look for toxic substances in a crime scene, and act as experts when presenting this evidence in court.
Odontologist - This specialist is also known as a forensic dentist. They examine evidence related to teeth and bite marks, and also assist in the identification of a person by their dental records.
Entomologist - Entomology is the study of insects, the forensic entomologist looks for the presence of different types of insects and larvae to help determine time and location of a crime. They can be vital to proving whether a crime took place at the scene, or another location. The entomological evidence can assist in proving where a crime took place, and how long ago.
Pathologist - Pathologists are trained medical doctors who attempt to determine the cause of death of a person. They conduct autopsies and present evidence to the cause of death of a person in a court of law.
Meteorologist - Forensic meteorology is the process of reconstructing weather events for a certain location. The forensic meteorologist reviews weather reports, radar and satellite images, and conducts interviews with witnesses to determine the weather at the time of a crime, and if this data matches up with the rest of the evidence.
Serologist - Serologists search for evidence of bodily fluids that may be found at a crime scene, either from the victims or the accused criminal. They may also be involved in blood spatter analysis or the collection of DNA from the fluids they have collected.
Musicologist - As the name suggests the musicologist is an expert who looks for musical or audible evidence and identifies the source. This could be listening to noises in the background of an audio or video recording to attempt to identify time and location.
Psychiatrist - Forensic psychiatrist often link between psychiatry, the stud and treatment of mental disorders, and the people that suffer from them, and the justice system. They interview accused criminals and determine if that person is competent to stand trial.
Palynologist - Forensic Palynologists are experts in the field of pollens and powders that can be found at a crime scene. Like the entomologist, they search for evidence that a crime took place at a certain location, and examine clothes to determine if a suspect had likely been at a scene based on the trace amounts of the environment they collect just by being there.
see think wonder lesson
LEARNING INTENTION
This is designed as an individual activity for students to complete. It encourages careful observations and thoughtful impressions. See Think Wonder activities also present the opportunity to develop ideas for potential inquiry topics or units in addition to pre-planned lessons.
Before the students begin the activity for themselves the types of information and answers that could be included under each section of See Think Wonder are discussed. Each fact or opinion or question will need be listed in the appropriate column or area, and so the differences should be discussed so students can differentiate between them.
See - What observations can the students make from the visual image alone? Ask the students to describe some of the things they can see in the picture. Things that are acceptable for See answers are facts about the image, for example how many people or items of furniture are visible
Think - What opinions do the students have based on their observations? What conclusions might they draw? This section allows the students to speculate on possible reasons for what they have seen. Care should be taken to ensure that students include evidence or a reason for their opinions, and how the information that they have available helped them make this decision.
Wonder - What questions does the image leave you with? What would you like to know more about? Any unanswered questions that the students have should be included in this section. The questions could relate directly to the image itself, or the lead up or after math to the image.
Procedure
Introduce the idea of a 'See Think Wonder' activity and scaffold the boundaries of each area of inquiry as described above.
Each area of inquiry and a key word are listed on the whiteboard for student reference. Ask the students for what they feel the key words could be, but possible suggestions could be:
See - Fact
Think - Opinion
Wonder - Question
The students will be shown a picture of a crime scene with no text or background information. They will then be asked to complete a See Think Wonder activity page and begin to make observations, develop opinions, and ask insightful questions. Answers can be listed in point form to begin with.
After a set period of time the students are brought together and asked to contribute their facts, opinions and questions to a combined class list. Use of an electronic whiteboard if available is recommended.
Begin by asking for facts. As the students offer their answers ask why they think it is a fact.
When moving on to think answers and the opinions that students have formulated make to remind the students that any of these opinions will need some form of support. Students should also be advised to respect the opinions of other students.
Explain that the ‘wonderings’ of the class are important because they often lead to further questions that could form the basis of further units of inquiry. It could also allow students to make connections with information and facts that they already know.
List the questions of the class on the whiteboard, along with any suggestions for possible answers or places to find the information.
A possible extension activity would be to assign each question to a group of students for them to come up with information and possible answers or solutions.
Materials
To complete this activity you will need a suitable picture to show, a See Think Wonder activity sheet for the students to begin to make notes or answers on, and a whiteboard (electronic is possible) to combine the class responses.
Catering for Inclusion
Scaffolding of the types of answers to See Think and Wonder can make each of the categories easier to define. Students do not have to write their answers out in full, notes are acceptable, and further meaning or clarification can be obtained by questioning as the students contribute their answer to the group.
perimeter and area lesson

We are not entirely sure if this was ever a common practice or if it was just a product of television and film. We've reviewed a lot of historical crime scene photos and I’ve rarely seen any type of marking, let alone a full outline. Though before the advent of instant (Polaroid) or digital cameras I can imagine an investigator marking a body position before it was moved so he could keep a 'perspective' while investigating the scene.
Area and Perimeter are common mathematical calculations. Often thought of, and used in similar circumstances though their formulas are very different. Both calculations are used to define aspects of two dimensional shapes or spaces, such as squares, triangles, rectangles, or circles.
The perimeter of any two dimensional object is the total distance around the OUTSIDE of an object, measured in specific units. Perimeter is measured by adding the lengths of every side of a shape or object. Klerk, J (2007) p.97.
The easiest way to calculate a complex shape is to break the the 2D shape down into parts that are more easily measured.
INTRODUCTION
The goals for this activity include a review of students' current knowledge of how to measure the perimeter and area of complex 2 dimensional shape in this case the chalk outline of a fellow student.
This activity should be monitored with short achievable goals set so that you can see where mathematical competencies are. We would recommend pairing students with high ability to those with less ability so they can benefit each other.
MATERIALS
Chalk
String
Meter Rulers
Tape
Scissors
You will pair up student's and tell them they will be going outside to use string to measure the perimeter of a chalk drawn body outline on concrete. Once they have outlined one person you will then ask them to estimate the overall length of the perimeter of the outline before actually measuring it using a long length of string.
INSTRUCTIONS ON PAGE
Ask the rest of the class what their perimeter lengths were to compare the differences. The class should go around and look at the body shapes, methods of calculation and results for discussion.
Before going back to class ask one of the student's to write the sentence 'Guess what we have measured?' and leave a piece of chalk. This could be an open celebration of the learning in-front of the entire school.
At lunch, or the next break we are sure your class will be looking to see if anyone answered correctly.
Area and Perimeter are common mathematical calculations. Often thought of, and used in similar circumstances though their formulas are very different. Both calculations are used to define aspects of two dimensional shapes or spaces, such as squares, triangles, rectangles, or circles.
The perimeter of any two dimensional object is the total distance around the OUTSIDE of an object, measured in specific units. Perimeter is measured by adding the lengths of every side of a shape or object. Klerk, J (2007) p.97.
The easiest way to calculate a complex shape is to break the the 2D shape down into parts that are more easily measured.
INTRODUCTION
The goals for this activity include a review of students' current knowledge of how to measure the perimeter and area of complex 2 dimensional shape in this case the chalk outline of a fellow student.
This activity should be monitored with short achievable goals set so that you can see where mathematical competencies are. We would recommend pairing students with high ability to those with less ability so they can benefit each other.
MATERIALS
Chalk
String
Meter Rulers
Tape
Scissors
You will pair up student's and tell them they will be going outside to use string to measure the perimeter of a chalk drawn body outline on concrete. Once they have outlined one person you will then ask them to estimate the overall length of the perimeter of the outline before actually measuring it using a long length of string.
INSTRUCTIONS ON PAGE
- One student lies down on the concrete and the other uses chalk to trace around their shape.
- Estimate how big you think the perimeter is of the shape and record that estimate on the concrete next to the body shape.
- Use your estimated length of string to measure all the lengths around the body. Tape the end of each length down to the concrete. Keep doing this all the way around the body.
- If your estimated length is too short, estimate how much more you think you will need and cut that length to add to the process. Record the extra length you added to your original estimate.
- Once you get all the way around the body, cut the string.
- Lay the string out straight, on the pavement, write out the addition of ALL the lengths to gain your answer before actually measuring the entire length of the string with the tape measure. Compare the estimate, to the sum of all lengths.
- Measure the overall length with the tape measure to get the perimeter and discuss the findings.
- Finally measure the overall length of the string to test the difference in the estimate, sum of all sides, to the overall length.
Ask the rest of the class what their perimeter lengths were to compare the differences. The class should go around and look at the body shapes, methods of calculation and results for discussion.
Before going back to class ask one of the student's to write the sentence 'Guess what we have measured?' and leave a piece of chalk. This could be an open celebration of the learning in-front of the entire school.
At lunch, or the next break we are sure your class will be looking to see if anyone answered correctly.
bite lesson
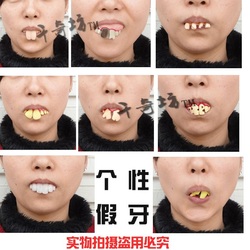
LEARNING INTENTIONS
This lesson is intended to allow students to further their knowledge of bite mark identification by creating and documenting their own teeth impressions. Students will be required to follow a procedure and have the specialist knowledge to record their findings.
Materials List
Scissors
2 x Styrofoam Cups
Permanent Marker
Block of chocolate or sandwich
The procedures for making teeth impressions are:
What other characteristics of the impressions do you notice?
Compare the top teeth impressions to the bottom.
Are there teeth missing, spaces, chips, etc.?
Practice being a forensic dentist by leaving the room. One student in the room will take a bite of piece of thick cheese or thick chocolate supplied by your handler[teacher]. See if you can identify the individual who took the bite by comparing the impressions with the bite in the sandwich or chocolate.
This lesson is intended to allow students to further their knowledge of bite mark identification by creating and documenting their own teeth impressions. Students will be required to follow a procedure and have the specialist knowledge to record their findings.
Materials List
Scissors
2 x Styrofoam Cups
Permanent Marker
Block of chocolate or sandwich
The procedures for making teeth impressions are:
- Put the two styrofoam cups together.
- Place the side of the two cups into your mouth as far as possible.
- Bite down on the cups firmly and then remove them.
- Label the top and bottom impressions: Top Teeth and Bottom Teeth.
- Study the teeth impressions.
- Count the number of teeth in the top and bottom impressions.
What other characteristics of the impressions do you notice?
Compare the top teeth impressions to the bottom.
Are there teeth missing, spaces, chips, etc.?
Practice being a forensic dentist by leaving the room. One student in the room will take a bite of piece of thick cheese or thick chocolate supplied by your handler[teacher]. See if you can identify the individual who took the bite by comparing the impressions with the bite in the sandwich or chocolate.
blood splatter engagement activity
This YouTube clip shows a quick math lesson on aim and hypothesis via red food dye as mock Blood Splatters. The children calculate the average diameter at varying drop heights.
MATERIALS
Red Food Colouring
Eye Dropper
Ruler
Pen
Paper
MATERIALS
Red Food Colouring
Eye Dropper
Ruler
Pen
Paper
BLOOD SPLATTER LESSON
LEARNING INTENTION
In this lesson students will learn about the behaviour of liquid when dropped onto a flat surface, and the effects that height and direction have on the resulting shapes. They will conduct an experiment, document their results and be encouraged to speculate on these results.
PREPARATION
Before conducting this lesson it is advisable to select an appropriate area. There may be mess, so also arrange some drop sheets or plastic sheeting. It would also be a good idea to prepare some fake blood (recipe ideas). You could even do an additional lesson on this with the students if you have time. Assemble all of the materials you will need (see below) and remind the students about the protective layers for over their school clothes.
Art smocks will do for those that forget. Make sure that students read the Blood Splatter section of the Forensics Unit in preparation.
PROCEDURE
Introduce the lesson by asking if the students have done their required reading, and then asking for students to share their expert knowledge.
Begin by asking three students to act as volunteers to model the first activity and the roles that each student will perform.
Explain each role and the equipment required as each steps forward.
Dropper – Holds the eye dropper full of ‘blood’ and squeeze out the drops onto the paper below. Model how to gently squeeze the dropper so only a single drop comes out. Make sure that the dropper holds the eye dropper still during this experiment.
Measurer – Holds the ruler upright and ensures that the dropper is holding at the correct height. This person is most at risk of being splashed, so make sure they wear full covering and goggles.
Recorder – This person makes notes on the large piece of paper after each drop. They are to record the height and dropper’s name.
Spread a large piece of paper on the floor, and record the student’s names in the top corner.
Move the three students into position above the large piece of paper and have them set up to drop from 20 cm above the floor. This is high enough so that everyone can see what is going on.
Have the measurer confirm the height is correct, and then have the dropper squeeze out a single drop and let it fall.
Ask the recorder to record the dropper’s name and the height of 20cm next to the resulting splat.
Repeat the process again fully, but this time from 50cm above the floor. Make sure second drop lands far enough away from the first. Ask the students if they feel the drops are far enough apart, and what distances they would suggest using.
Tell the class that they will each have a turn at each of the three roles during the experiment. Ask if there are any questions so far.
Introduce the second activity as examining the effect of movement on the blood drops.
Ask for ideas on why the drops might be formed with movement (swinging of a weapon or movement of a body) and what predictions they can make on what effect this will have compared to the straight drop they have just seen.
Ask the students to swap the eye dropper for the paint brush and dip in into the ‘blood’.
Model the movement you want the students to use – a wave of the arm from left to right with the brush facing the paper on the floor, and remind them to keep the brush at a constant height.
Ask the students to wave the brush across the paper from left to right. The recorder makes their notes next to the line of drops.
The process is then repeated from right to left.
Ask the students if their predictions were accurate, and explain this is the purpose of experiments – to accurately measure effects rather than speculating on results.
Again ask if the class has any questions on either of the two activities.
Ask the students to divide up into groups of at least three and distribute the record sheets. Ask the students to make sure they collect all of the required materials before moving to an area and beginning the experiment.
Teacher will move around the room offering advice and asking questions of the students to check their knowledge as they take turns to complete the experiment.
As the groups get close to completing the activity check to make sure they have completed all of the steps so far, and then instruct them to pack away their materials as the rest of the class finishes.
Make sure students step clear of each other’s work as they return materials to containers and remove their protective clothes.
This pack up time should allow for the ‘blood’ drops to dry. If not this might be a good time for recess or lunch depending on when you have scheduled the lesson.
Gather the group at the front of the room. Ask for comments on how the experiment went, what they found easy and what they found hard. Using the paper that you modelled with earlier demonstrate cutting the drops out and sticking them to the record sheet in the area provided. Ask the students what other information they need to fill out on the form.
Model suggestions for the comments that could be written at the end of each record sheet for the students’ predictions.
Demonstrate cutting out a long strip with all of the drops on it, and then separating the single straight down drops, before sticking them next to the relevant height list on the record sheet.
Repeat this for the line of left to right drops.
Have the students go back to their group area and cut out the long strips with each of their drops. They can then move back to their desks for separate the drops and glue them into place.
Collect the forms when students are done after ensuring that all fields on the record form have been completed.
Gather the class together to close the lesson by asking if they were surprised by any of their results, and if they developed any theories from the experiment.
Allow the completed forms to dry before either displaying around the room or adding to student forensics folio.
MATERIALS
Fake ‘blood’ (use either ink or thin red paint)
Eye Dropper
Paint Brush
Metre Ruler
Tape Measure
Sticky Tape
Pencil and Paper
Glue and Scissors
Art Smock/Lab Coat or old clothes
Goggles
Large Sheets of Paper
Drop Cloths or Plastic Sheeting
Copies of both of the record forms for each student.
EVIDENCE OF LEARNING
During the lesson you will observe students following a procedure. At the end of the lesson you will have the completed form with their blood drops and written predictions or assumptions.
CATERING FOR INCLUSION
Suggest appropriate groupings to cater for lower students, and pair them into higher capabilities.
| splat_activity_record_sheets.docx |
codes and code breaking lesson
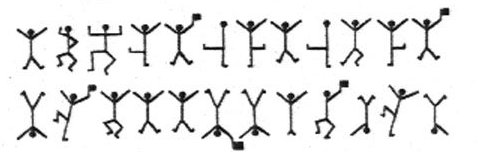
- Begin the lesson by discussing different types of encryption. Ask the students to give examples of codes they may have encountered.
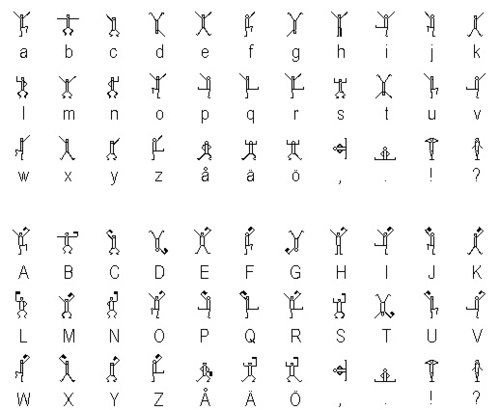
- Create a systematic way of deciphering a code. Begin with the example of Sherlock Holmes' Adventure of the Dancing Men.
A man reports that his wife, Elsie, became upset when she received several notes with figures of dancing men on them. Holmes went about deciphering the code. He knew that E is the most common letter in the English language and that there was a high probability that the name "Elsie" appeared somewhere in one of the messages. Using this information, can you decipher the messages she received and the one message she sent? You may also want to find out what the other most common letters used in the alphabet are in order to help you.
CODE BREAKING LESSON
- • Using and applying mathematics to solve problems.
• Performing mathematical calculations accurately.
• Identifying numerical patterns and sequences.
• Process, present and interpret data to pose and answer questions. • Recognising the rich historical and cultural roots of mathematics.
• Understanding that mathematics is used as a tool in a wide range of contexts.
- KEY CONCEPTS AND SKILLS:
- Substitution
- Frequency analysis (beginning level)
- Logical thought
- Sequencing
- Patterns
- Probability
- Critical thinking, conflict resolution, observation, and analysis skills
- Ask the students how they would go about deciphering these notes written between two characters in a Sherlock Holmes story. Discuss alphabet frequencies. Have the students find the most common figure used in the puzzle. This figure most likely represents an 'E'. The frequency of letters is usually E-T-A-O-I-N.
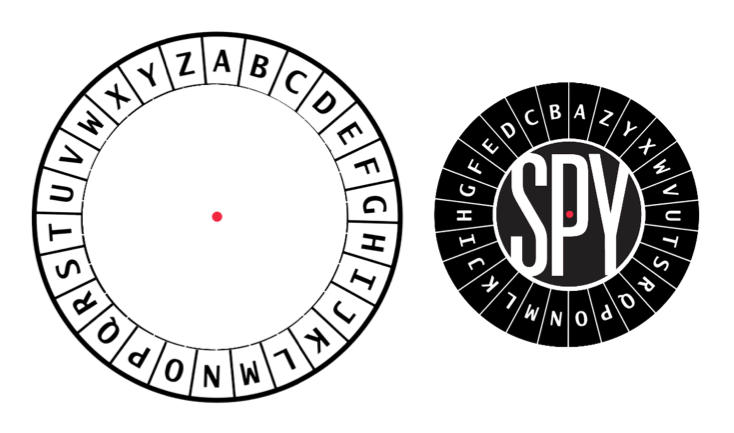
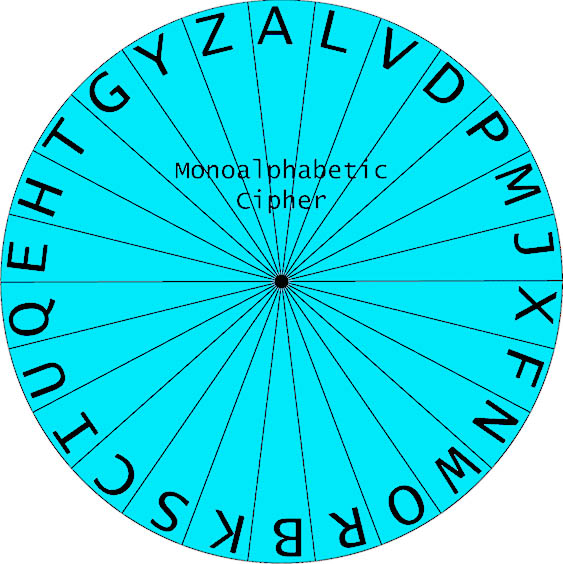
- Demonstrate the difference between a rotated alphabet code and a random alphabet code.
- Show the students how a rotated alphabet code could be defined by a mathematical equation.Example: given a code where the alphabet is rotated 5 spaces and A=0, B=1, C=2 and so on ... .
A => F D => I
B => G E => J
C => H F => KX = the original letter Y = the encoded letter X + 5 = Y
So, "HI" becomes "LM"
since H = 7
7 + 5 = 12
and 12 = L
Discuss anagrams as a type of code where the letters are re-ordered to make new words. An example of this is the movie title "Con Bites Male Flesh". This is an anagram for "Silence of the Lambs". Have the students try to make anagrams of their own names. They may want to use an anagram finder.
ALTERNATIVE Codes & Code breaking Lesson
- Begin the lesson by discussing different types of encryption. Ask the students to give examples of codes they may have encountered.
- Create a systematic way of deciphering a code. Begin with the example of Sherlock Holmes' Adventure of the Dancing Men. Ask the students how they would go about deciphering these notes written between two characters in a Sherlock Holmes story. Discuss alphabet frequencies. Have the students find the most common figure used in the puzzle. This figure most likely represents an "E". The frequency of letters is usually E-T-A-O-I-N.
- Use Decode de Code to determine other clues to look for when deciphering a code: punctuation, short words, double letters.
- Demonstrate the difference between a rotated alphabet code and a random alphabet code using Decode de Code.
- Show the students how a rotated alphabet code could be defined by a mathematical equation.Example: given a code where the alphabet is rotated 5 spaces and A=0, B=1, C=2 and so on
A => F D => I
B => G E => J
C => H F => KX = the original letter Y = the encoded letter X + 5 = Y
So, "HI" becomes "LM"
since H = 7
7 + 5 = 12
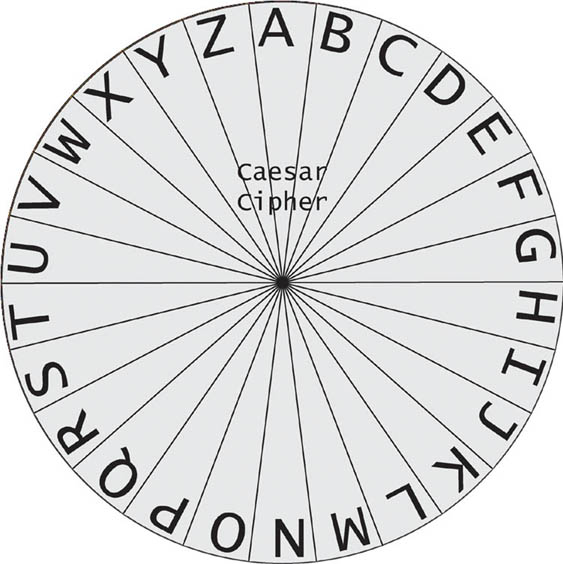
and 12 = L - Use Caesar's Cipher to encode messages using an algorithm such as that explained above. Also demonstrate the use of a multiplier instead of a constant as an encryption method.
- Allow students time to practice their skills at decoding messages by using Caesar's Cipher II.
- Discuss anagrams as a type of code where the letters are re-ordered to make new words. An example of this is the movie title "Con Bites Male Flesh". This is an anagram for "Silence of the Lambs". Have the students try to make anagrams of their own names. They may want to use an anagram finder.
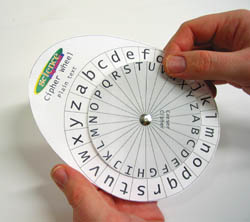
CIPHER WHEEL EXAMPLES
combination lock challenge
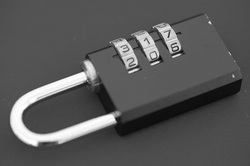
Suggest your student's try to decode a combination lock or bring one in for the class to try to break. If so also ask them to document every attempt/combination that they try in order to test their perseverance and logical mathematical thinking skills.
ALTERNATIVELY
Bring in a small safe if you can and have the students' try to open the safe. Perhaps you could leave it in class for the duration of this unit of inquiry.
Bring in a small safe if you can and have the students' try to open the safe. Perhaps you could leave it in class for the duration of this unit of inquiry.
extension project
mug shot lesson plan
Before this class it is recommended that the students are asked to bring some dress up items to school for the following day. If a height chart is available it should be set on a wall of the class room. Alternatively a series of lines can be printed onto A3 paper to act as height chart and picture back ground.
LEARNING INTENTIONS
This lesson is intended to increase and demonstrate student ICT knowledge and skills, specifically taking and storing digital photos, as well as using their creativity to come up with a criminal persona for a photograph.
INTRODUCTION
Ask the students if they have heard the phrase mug shot before, and ask for any information that they have to establish prior knowledge. Make a list of these facts on the board.
Ask what information the students feel would be essential to show in a mug shot. List this information of the board as well.
Explain the task to the class. They will be required to write a descriptive list that will be displayed on a card in their mug shot. They will then take a picture with this card held in front of them, and display the resulting picture in a class identification wall. Make up and dress up items are encouraged for the picture, but ask the class to make sure that they are still recognisable as themselves for the picture. These pictures will be displayed on a class wall to show who is participating in the unit.
The information that should be included on the card includes:
Name:
Alias: Suggest students create a ‘criminal mastermind name’ by combining the name of their first pet, with the name of the street they live on for example Pablo Karma, or Kitty McNamara.
Height: Eye Colour:
Date of Birth: Date of Arrest:
Once the card information has been proofread the students should use a computer to design an appropriate template, fill it out and print it.
Students that have finished this task will then be allowed a small amount of time to dress up and decorate their faces for their mug shot. Have the students select a partner to help with make-up and decoration, and to assist each other in taking the mug shot picture. Make sure that the student is recognisable as themselves before moving them over to a photo area in the classroom in front of the height chart.
Have the students take turns to photograph each other. Suggest that they take a maximum of 3 pictures before swapping places. Allow the students to choose their favourite picture before saving it to a specified location (either on the school server or computer hard drive). This should be modelled so all pictures end up in the same place.
Allow some time to create an information card for yourself, and to have your picture taken along with your students. You are part of the class after all!
Have the students clean themselves up and put away all of their dress up items.
Before ending the class show a slideshow of the completed photographs to allow students to see each-others work.
After the class is complete print the pictures (use either the normal printers or place the pictures on a USB drive and have them printed at a shop) and display the student’s work on a wall around the classroom.
MATERIALS
This activity will require the use of computers and a digital camera, so ensure that adequate resources are reserved for the activity.
As most of the production work is done electronically students will only need their work books to make the original list of information.
Depending on budget allowances the printing can either be done B&W or colour on standard printers, or taken to photo shop (or Officeworks) to be printed onto photo paper
EVIDENCE OF LEARNING
The evidence of learning for this activity will include the rough drafts of the lists that the students write in their books, and the finished photo. This will demonstrate the students’ ICT knowledge of correctly creating and saving an image using multiple forms of electronic media and software.
CATERING FOR INCLUSION
Encourage knowledgeable students to help others when using the computer and digital camera.
EXTENSION ACTIVITIES
Visit the Early Mug Shots pages for ideas and inspiration to recreate a mug shot from years gone by.
Origin of the term ‘mug shot’. Ask students to use their research skills to discover the origin of the term mug shot.
IDENTIKIT ACTIVITY

Supply students with a collection of all sorts of magazines with plenty of faces in them for the following activity.
Using magazines instruct students' to try to match the visual images on the page.
Choose one of the following images and try to recreate an identikit.
Alternatively, you could write your own descriptions based on the magazines you have.
This exercise could turn into a WANTED POSTER.
Using magazines instruct students' to try to match the visual images on the page.
Choose one of the following images and try to recreate an identikit.
Alternatively, you could write your own descriptions based on the magazines you have.
This exercise could turn into a WANTED POSTER.
WATCH YOUR STEP ENGAGEMENT ACTIVITY
watch your step lesson

LEARNING INTENTIONS
This lesson is intended to allow students the opportunity to conduct an experiment while following a procedural text. Students will follow a written procedure to create a plaster cast of a foot print, and then document their findings in a written report.
ACTIVITY
Chose a partner and collect the resources that are listed in your course notes under Foot Prints.
Put soil into a container so that it covers the base and has a level surface. Add some water to bring the soil to the desired consistency. Remember – the soil must be soft enough to allow you to impress your shoe or boot print into it, but firm enough to hold the shape of the impression once you remove your foot.
Decide on whether you will create a boot or foot print, and then stand in the container to create a print in the soil. Be mindful to place your foot straight down, and lift it straight up to give the clearest print. If you are happy with the print you have made in the soil you can take a picture for evidence. If not smooth the soil, add some more water, and repeat the process.
Open the plaster packet that is included in your forensics kit, and pour into a bucket with the amount of water stated in the directions. Be careful to measure exactly - to much water and your plaster will not set, not enough and the mixture will not completely fill the print and your cast will not be useable.
While you are waiting for the plaster to set you can start filling out the evidence collection form. Be thorough in what you write down – this could be evidence in a court of law.
Ensure that all of fields are completed.
Once the plaster is set you can carefully turn the container over and gently remove the plaster mould. Take your time and make sure that you don’t drop your plaster mould - damaged evidence cannot be used!
Use one of the brushes from your forensics kit to remove the remaining soil, before measuring the print and recording the information on the evidence form. Take a picture of the plaster mould. Next look for any identifying features such as tread pattern, obvious cuts or wear marks, or any features of the foot such as length of toes, and add these to the evidence.
When you and your partner are satisfied that all of the required information is included on the evidence form you can file the form in your record folder, and add an evidence tag to your plaster cast and ensure that any photographs taken are named and stored in the appropriate folders.
Be thorough as you follow each of these steps to ensure that the evidence you collect is of high quality, and you paperwork is complete.
The evidence you gather could vital in a court case.
MATERIALS
Containers for soil – shoe boxes are ideal!
Soil without any large rocks
Containers of water
Plastic stirring spoon
A suitable outdoor area to conduct the experiment, or indoor area with no- slip easy to clean floor
Plaster mix
Brushes
Tape measure
Camera
Evidence tags
Evidence forms
Mark the water jugs at the level required to correctly mix the plaster.
| watch_your_step_rubric.docx |
Hair and Fibre Analysis Lesson

LEARNING INTENTION
During this activity the students will be examining a selection of hair and fibre samples, before using a template to catalogue them.
For the activity you will need to provide a selection of different hair and fibre samples to analyse. This can be done by collecting hair from yourself or pets, and fibres found around the home. Take the fibres and place one end against the sticky side of some clear tape, leaving most of the hair off the tape. Then cover the tape with another layer of clear tape. You will end up with a thick piece of tape with some strands of hair trailing from it. Place a number or letter at the base of each hair for student reference, and record what each sample actually is to compare against student predictions.
Model for the students the process of examining and documenting the evidence. You will need a pair of gloves, ruler, magnifying glass, record sheet and a pen. If possible use an electronic whiteboard to show how to use the recording form.
Start by putting on some gloves and selecting a sample. Record the number of the sample before measuring it and recording the value. Use the magnifying glass to examine the hair, looking for colour and shape, texture or any other identifying characteristics. Write each of these in the squares provided.
After recording the values for the class to see, ask them what they think the sample is, and where it came from. Document the answers and the reason/evidence given by the students.
Ask the students to document as many of the samples as they can in the time allowed. Remind them that it is not how many samples they examine, but how thoroughly, and how well the evidence is documented.
Send the students back to their desks with recording forms and have them begin the exercise. Having several sets of sample hairs will mean that this part of the exercise can move along a lot quicker as students do not have to wait long.
At the end of the session bring the class together as a group to discuss their findings. Ask the students to offer their ideas and predictions, and also the reasons they have as to why they think a certain sample is what it is. Note down suggestions on the whiteboard and save the completed record sheet.
Conclude the lesson by revealing the true identity of each of the samples and have the students note down on their recording forms if they were right or wrong.
Keep the forms as an example of student learning, and add it to the student’s folio of forensics work.
EVIDENCE OF LEARNING
At the end of this lesson you will have completed examples of individual student work, as well as a saved document showing initial student understandings, and samples of student theories and supporting evidence.
MATERIALS
Gloves
Ruler
Magnifying glass
Record sheet
Pen
Interactive Whiteboard
Multiple samples of hair and fibre labelled with numbers only on sticky tape.
Envelope for the hair and fibre
| hair__fibre_record_sheet.docx |
FINGERPRINT LESSON
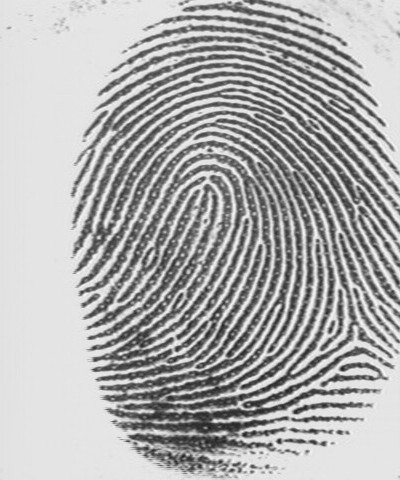
LEARNING INTENTIONS
In this lesson students will learn about the identifying characteristics of fingerprints, learn to take their own fingerprints, and count the characteristics they have. They will then complete an activity to compare their results with those of the rest of the class, and determine the most and least frequently occurring characteristics.
PROCEDURE
Students a are given a brief introduction into how fingerprints can be used as evidence, before watching a demonstration of how to use an ink pad and fingerprint card to record their own fingerprints.
Roll the “print” portion of your thumb over the inkpad from the left side of your thumb to the right. You do not have to push down really hard!
Roll the “print” portion of your thumb from the left side of your thumb to the right in the correct box on your paper to make a thumbprint. Again, you do not need to push down hard as this could cause the print to smudge and blur. Use a light pressure.
Continue this process to make a fingerprint of all ten fingers on the “My Prints” worksheet. You may want to clean your fingertips in between each print to avoid accidentally smearing the next print.
Use the reference sheet and your notes and a magnifying lens to help you figure out what type of pattern is found in each of your fingerprints. Label each one with the pattern’s name.
Once the demonstration has been completed the students will be given the materials needed – ink pads, fingerprint cards and wipes, and asked to take and record their own finger prints.
Once all ten prints are successfully recorded the student will use the reference cards to identify any loops, arches or whorls that they have, and note down each feature under the print.
Students will then use the numbers of these characteristics to make a prediction about how often they will occur across the entire class. Will the numbers be the same for all students? Encourage the students to include a theory to go with their predictions.
Once all students are finished this task they will survey the entire class, compile their results and complete a worksheet to record their findings.
A rubric has been included that can be given to the students to guide them during the activity. Standards and expected outcomes are listed along with scores.
MATERIALS
Ink pad, fingerprint card, identifying characteristics reference sheet, magnifying glass, wipes to clean up afterwards.
EVIDENCE OF LEARNING
At the end of this lesson the students will have a completed fingerprint card with all ten of their prints, and a completed activity sheet. There is a rubric included that can also be given to the students for reference during the task.
You could base your assessment on the following three-point rubric to evaluate students' work during this lesson. Students should be able to work well in groups, follow the directions to make fingerprints, identify their fingerprints accurately, and record their data accurately.
THREE POINTS
Students worked together effectively in their groups, followed directions accurately, were able to make all their hand's fingerprints, were able to identify all the fingerprints in their group, and recorded their data accurately and completely.
TWO POINTS
Students worked together somewhat effectively in their groups, followed most of the directions accurately, were able to make most of their hand's fingerprints accurately, were able to identify most of the fingerprints in their group accurately, and recorded most of the data accurately and completely.
ONE POINT
Students had difficulty working together in their groups, followed some of the directions accurately, were able to make some but not all of their hand's fingerprints, were able to identify a few of the fingerprints in their group accurately, and recorded some data.
CATERING FOR INCLUSION
Students are able to help others during the fingerprinting stage. Survey techniques can be modelled for the group to aid in collecting data for the second part of the task.
| fingerprint_analysis_documentation_sheet.docx |
| fingerprint-cards.jpg |
| fingerprinting_blank_card.jpg |
| 28932_f520.jpg |
CRIME AND PUNISHMENT ACTIVITY
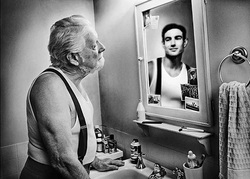
LEARNING INTENTION
In this lesson students will use the images provided as an inspiration to consider the reality of being convicted of a crime. This could be a rich source of discussion for session on Civic and Citizenship, and what it means to be a law abiding citizen. Students will also have the opportunity to write an imaginative piece describing the circumstances of the young man or woman’s imprisonment.
The extension activity allows students to use prior knowledge to list and comment on infamous criminals that they are aware of.
SHOE IMPRESSION TRANSFER ACTIVITY
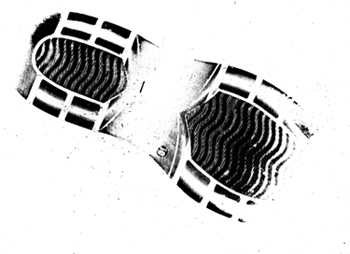
LEARNING INTENTION
To engage the students’ interest before the main foot print exercise they will conduct an experiment to discover the owner of a mystery shoe.
This is an excellent warm up activity for the foot print exercise, and doesn’t take long to set up or conduct.
Before the lesson you will need to secretly ask a student to make a shoe impression of their left shoe by standing on a piece of contact (sticky side), and then sticking the contact and resulting impression to a piece of coloured card or paper.
When the class returns from recess or lunch show them the mystery footprint and ask how they could work out who it belongs to.
Explain that they will each be taking an impression of their left shoe, and then the entire class’ prints will compared to the mystery print. The students will then write a short explanation of who they think is the owner or the mystery print, and the evidence they used to make this decision.
Model the process of taking a shoe print for the class.
Take a piece of contact and remove the backing paper.
Place your left shoe on the sticky side of the contact and stand with your weight pressing down.
Remove your foot from the contact: there should be an impression on the contact. It does not have to be perfect of exactly defined. If nothing is there apply some dirt to the bottom of the shoe, or rub over it with a pencil and repeat.
Have the students select a piece of coloured card and write their name in the top corner. Carefully place a piece of coloured card over the print and smooth it down.
When you pick it up there should be an impression clearly visible against the card.
Collect all of the cards and display them where all students can see.
Have the students come up in small groups and quietly compare the mystery print to those of the entire class. Rotate small groups until all students have had a chance to view the print.
Once each student has had a chance to view all the shoe prints send them back to their desks to write a short report detailing their findings. It should include who they think the mystery shoe print belongs to, and the evidence they used to make this decision
At the end of the class the owner of the mystery print is revealed, and a show of hands is asked for to show how many people guessed right.
MATERIALS
Several rolls of clear contact
A4 coloured card or paper
Pencils
Scissors
EVIDENCE OF LEARNING
At end of this activity you will have a completed shoe print recorded on a piece of coloured card, and a short written piece explaining the student’s finding and reasons behind them.
CATERING FOR INCLUSION
This exercise is specifically catering for inclusion due to its simplicity.
EXTENSION ACTIVITY
Repeat the same process, but have the students use their bare feet instead of a shoe. The feet will need to be slightly dirty, so letting the students walk around barefoot for a few minutes will help in this activity.
ADDITIONAL RANSOM NOTE LESSON
THE HEIST - RICH TASK
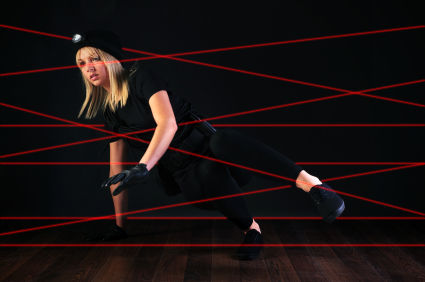
LEARNING OUTCOMES
This lesson is intended to allow the students to display all of the skills and techniques they have learned during the unit. The students will plan; assign tasks, record data and present written reports as a part of both the Investigation Team and the Criminal Element.
This is a large scale activity that will take several sessions to plan, and several more to complete. The students will be expected to design a security system to protect an item within a set space such as a section of hallway or corner of the classroom. They will also be expected to leave and discover evidence of the types learned about during the unit, and complete documentation of their activities. This will allow students to display the skills and knowledge they have learned, and use the techniques and finished pieces of work created during the unit.
As the task is rich and contains multiple areas of activity and learning the notes have been divided up into sections that will help with planning and assessment. Previous lesson plans, rubrics and completed work will be used throughout this task, and these notes will direct you back to the relevant lessons for reference purposes.
The rubric has been designed specific to this task, and as such is directed towards the correct use of previously learned materials. It is designed as a group assessment, and no individual marks will be awarded.
Part 1 - EXPLANATION OF THE TASK
During this session you will be introducing the final task for the unit, and explaining all of the elements involved. A check sheet listing the parts of the various steps has been provided, and should be given to the students during this session for them to refer to. The teams should also be assigned during this time. Ensure that each team has a wide range of ability levels and skills when selecting them. This will not only cater for the inclusion of lower ability students, but ensure that all roles can be completed, and that each student will be able to work to their strengths to contribute to the overall success of the task.
TEAM INVESTIGATORS ROLES
Design the security system – Ask the students what they believe would make effective security measures for their item. They should be thinking of what devices or techniques will aid them in gather potential forms of evidence. Suggestions such as cameras for facial identification, soft floor sections to collect boot prints and surfaces that will retain finger prints should be encouraged, while other less suitable methods such as guard dogs and pits should be discouraged. Remind the students that this task is about evidence, not just protecting the item
List the elements of the system – Should be a list not only what the item or device is, but how it will aid in the collection of useful evidence
Construct the system – Give the students a defined area to use, and have them design a plan to be presented. It should include measurements and a materials list. It must also be safe for students to move around in. The system must be able to be assembled and dismantled in 20 minutes.
CRIMINAL ELEMENTS ROLE
List of Evidence you will leave at the scene – This activity is not just about the theft, you are putting the other team to the test. You will make a list of 4 forms of evidence that you will leave at the scene for the other team to find. All 4 must be found, so don’t hide them to well! The list will include the type and location of the evidence, and how it links back to a team member. This could be the shoes they are wearing, finger prints, hair, or even teeth marks.
The Plan – After viewing the other team’s security system for 2 minutes you will write a descriptive piece detailing how you intend to defeat the system. Include mention of all elements of the system that you can see
The Aftermath – After completing your crime, write a group reflection detailing how effective your plan was, what worked well, and what you might do differently and why. Also reflect on how elements of the course helped you in your task
ASSESSMENT
Discuss the rubric with the class in relation to the task and checklists they have been given. Explain that as this is a group task there will be no individual marks, but teamwork will play a large part in the assessment, and that everyone needs to contribute. Explain each criterion on the rubric, and draw attention to the elements that will get the groups good marks. Ask questions to gauge student understanding at the end of the session. Remind the students to refer to the rubric as often as they refer to their checklists.
MATERIALS
For this session you will need copies of the checklists and assessment rubrics for each student, electronic whiteboard, lists of the final groups
EVIDENCE OF LEARNING
As this is mostly a planning session there is not much evidence of learning to be collected. Observations about teamwork can start to be made.
CATERING FOR INCLUSION
Be mindful of the makeup of the groups. Ensure that each group has an equal mix of high and low ability students, as well as students with different strengths.
Part 2 - PLANNING THE SECURITY
In this lesson you will begin by asking the students to reflect on the types of evidence they have learned about during the course. You will then ask the student to think about what things they could include in their security systems that would help in collecting this evidence. Discuss with the entire class what acceptable and unacceptable methods could be. NO dangerous methods will be permitted, and the teacher will have final say on whether a particular element may be used.
Before getting the groups to separate set out the areas that each group will need to work within, and have members of the group record the measurements of the area. Also explain that all parts of the system need to be provided by the students themselves, and to take this into consideration when choosing their options.
Allow the groups to separate and have a brain storming session and create a mind map of ideas and methods that could possibly be used, and how they could integrate them into their system.
You should spend some time with each group separately to observe their teamwork and offer advice on their ideas. Each team will be expected to produce a written outline of their plan by the end of the session. The final design is not expected to be finished straight away. This can be completed during other stages of the process by some members of the team while others work on different aspects of the group effort.
At the end of the session ask the groups to come together, and discuss how the session went, what they found easy and what they found hard. Tell them not to give away specifics about their plans, instead just to comment on the collaborative design process.
MATERIALS
Large sheets of paper for the mind maps.
EVIDENCE OF LEARNING
At the end of the session you will have written evidence including the mind map and written outline of the group plan. This is not the final plan, and can be used as a comparison to show the drafting and revision process when compared to the finished product.
CATERING FOR INCLUSION
Encourage all members of the group to offer suggestions during the planning phase, even If they are not included in the final plan.
Part 3 – EVIDENCE
The purpose of this session is for the students to decide which sorts of evidence they will choose to leave at the scene. The role of evidence in the task is central, and the teams must take care to explain not only what sort of evidence they will leave, but where they might leave it. In this session you will be reminding the students of the types of evidence they have studied so far, and the methods used to collect and document it. Begin by asking for suggestions of the different types of evidence they have studied so far, and how they can use the skills they have learned in collecting evidence to make some evidence of their own. Write suggested methods on the whiteboard as students suggest them. Remind the students that the evidence they leave is supposed to be found, and that they will lose marks if the evidence is to well hidden.
Explain that the groups’ task for the session is to create a list of the 4 forms of evidence they intend to leave, and what methods they intend to use to create the samples, and how they intend to leave the evidence at the scene for the other team. Suggest the use of a mind map to begin the process.
Separate the groups and let them begin working on ideas. Circulate between the groups to monitor progress and offer ideas and solutions as required. Students will be expected to have a list of 4 types of evidence and collection methods at least partially completed by the end of the session. The list can be completed by group members in later session while the rest of the group works on other elements of the task.
Close the lesson by bringing the group together and discussing the types of evidence and collection techniques that they decided to use. Tell the groups not to be specific, as the other group will have to find the evidence.
MATERIALS
For this session you will need an electronic whiteboard, and large sheets of paper for mind maps.
EVIDENCE OF LEARNING
At the end of the session you should have the mind maps that the students made while planning the evidence and techniques they intend to use, as well as a list of the 4 they intend to leave at the crime scene. You will also have a record of previous methods of evidence collection studied in the course from what was recorded on the electronic whiteboard. This will act as a check of the skills and knowledge covered in the unit up till this point.
CATERING FOR INCLUSION
Encourage all members of the group to offer suggestions during the planning phase, even If they are not included in the final plan.
Part 4 – SETTING THE SCENE
In this session the students will construct their security systems in their assigned areas, and set up the evidence they have decided to leave behind. Before the session it is advisable to warn the students in advance of the time they will be allowed to set up their areas to make sure that they have time to collect all of their required materials.
Begin the session by asking for suggestions on how the students might set up their security systems quickly and efficiently. Remind them of the importance of teamwork, and of organisation when it comes to which tasks should be done in which order. Each team has 20 minutes allocated to set up their area. Make sure that each team has a written and drawn copy of their plans before they begin.
Send the groups to their areas and allow them to begin setting up. Observe them for evidence of teamwork and an equal sharing of the work as they go about their tasks. Offer advice where appropriate, but try to let the students do as much of their own work as possible. Give time warnings as the end of the session gets closer.
At the end of the 20 minutes tell the students to stop setting up and assemble back in the classroom before explaining the next part of the session.
Explain that each group will have 5 minutes to look at the other group’s system, but will not be allowed to get close enough to enter the area. The purpose of this activity is to allow each group the chance to plan where they intend to leave their evidence when they attempt their crime. Groups of criminals would not attempt such a robbery without some degree of observation of the target, so each group will have a chance to develop a plan on how they will attempt to breach the other team’s security. Each group will then go back to their area of the room to document how they plan to commit their crime. The plan does not need to be detailed, but should include a description of the security systems they are sure are there, and their ideas to deal with them.
To close the activity bring both teams back together in the classroom and ask what they thought of the other groups set up, and if they had some ideas to defeat it. Ask them to comment on one area that each member of the team thought would be tricky to defeat. Collect a copy of each team’s planning document for later reference.
MATERIALS
The students will be asked with providing most of the materials required for this lesson as they set up their own areas. Ensure that the materials are being used correctly and that any possible sources of danger are identified and modified to ensure student safety.
EVIDENCE OF LEARNING
At the end of this lesson you will have the set up areas of both teams. It would be a good idea to have a photo or video record of the security system set up if possible. You will also have a written copy of each team’s observations of the target area, and suggested strategies to deal with identifiable parts of the security system. Teamwork and collaboration can be observed throughout the lesson.
CATERING FOR INCLUSION
Encourage all members of the group to offer suggestions during the planning phase, even if they are not included in the final plan.
Part 5 – THE PERFECT CRIME
In this session the students will first attempt to commit their crime, and leave their evidence behind. They will then go to their own area and collect the evidence left behind by the other team. This session can be done in stages, with each team attempting the theft and leaving their evidence without the other team watching. To add to the group aspect of the exercise this part can be recorded on a flip cam so that each group can watch the other after the evidence has been collected.
As this session will involve the collection of evidence it is advisable to revisit the earlier lessons on collecting evidence, and to have the equipment from those exercises ready for both groups to use.
Begin by ensuring that each team has all of the evidence ready to leave behind. Remind students to consider safety first, and to act sensibly and cautiously as they commit their crime. The aim is to be as stealthy as possible, not to rush the job.
Randomly decide which group will be the first to attempt the robbery, and move to that area. Allow time for the students to dress in their appropriate clothes for the role if they wish. The other class must stay behind so they cannot see exactly where the evidence has been left.
Make sure you have the camera ready and invite the students to begin their attempt. Observe teamwork and encouragement by team members during the exercise, and ensure that all safety rules are being followed.
Once the team has finished their attempted theft have them explain the types and location of evidence they plan to leave behind. Checks that the evidence is left as described and lead the students back to the classroom.
Have the first group begin writing their report on the evidence they left behind, and have the second group follow you to their attempted robbery location.
Make sure you have the camera ready and invite the students to begin their attempt. Observe teamwork and encouragement by team members during the exercise, and ensure that all safety rules are being followed.
Once the team has finished their attempted theft have them explain the types and location of evidence they plan to leave behind. Checks that the evidence is left as described and lead the students back to the classroom.
Once both groups are back together congratulate them on a job well done so far, explain that next they will examine their security areas for the four items of evidence left behind by the other team. Ask them to explain the rules for collecting evidence, and ask them what equipment they will need to collect before beginning their collection. All of the equipment and resources required will be available from earlier lessons.
Have each group divide into smaller teams and look for specific evidence. Have them document and record the evidence as the find it.
At the end of the lesson bring the groups together and have them share the evidence they found at their crime scenes. Each group can confirm that the four samples they left behind have been found, and list any that have not, and the place they were left.
Ensure the evidence collected is secured for the next lesson and have each group first clean up their security area, and make sure all evidence collecting equipment is returned to the proper place.
MATERIALS
For this lesson the students will need access to all of the evidence collecting equipment that they used during the unit. Tubs containing the fingerprinting, footprint collection, hair and fibre analysis, bite mark analysis (student made cups with bite marks) should be centrally located so students can take what they need. All of the associated paperwork and forms should also be placed in the tubs.
EVIDENCE OF LEARNING
At the end of this session you will have observed the students negotiate each security area, and recorded it on a flip cam or smart phone. You will also have a preliminary list of evidence recovered from the scene. Teamwork and collaboration can be observed throughout the lesson.
CATERING FOR INCLUSION
Students can perform roles that include being a part of the robbery, or directing and offering advice from the outside of the security area. Students that are not able to attempt the robbery can instead be tasked with evidence collection.
Part 6 – EVIDENCE
This session is devoted to the recording and documenting of the evidence collected following the crimes, and to begin putting the resulting information together into a presentation. Students will work in small groups within their group to record the evidence using the forms and methods they have learned earlier in the course.
Begin by asking the students which forms of evidence they found, and ask for descriptions of how they recorded this sort of evidence earlier in the course. Remind them that they can go back through the online unit and review the pages dealing with the types of evidence they collected.
Have the students form into small groups to work on a specific piece of evidence recovered from the crime scene.
Send off each group one at a time to collect their equipment and any forms they will need to complete while processing the evidence.
Ensure that each group has the paperwork available to them as you circulate around the room. Remind students to go back through the online resource, or review work already competed, if they ask questions. All of these tasks have been done previously, and feedback given, so students should be able to complete this task with little or no specific instruction.
Ask the students to show you each form as the evidence is finished being process to ensure that it has been done, and then direct the students to begin assembling their evidence and theories, and being to create their presentation.
MATERIALS
Students may still need access to the various forms of evidence collection equipment, and the paperwork that goes along with them. Aside from that students will need their work books, and access to Power Point if they decide to make a digital presentation.
EVIDENCE OF LEARNING
At the end of this lesson you should have multiple completed evidence forms from each group detailing their findings. There may also be partially completed presentations. Teamwork and collaboration can be observed throughout the lesson.
CATERING FOR INCLUSION
As there are many different elements to this activity students will be able to use their prior knowledge to select contributions that will allow them to work to their strengths.
As the presentation may take some time to complete it is suggested that free time be made available during the course of several days to make final preparations before the next lesson. Specific plans need not be made, but students should be reminded to use their rubrics to ensure that all areas of assessment have been addressed.
Part 7 - CONCLUSIONS
In this session students will present their findings and explain how they reached these conclusions by giving a short presentation to the class. Each member of the team will be expected to contribute to the design of the presentation, or deliver parts of it to the class as a whole.
This session will be scheduled in advance to allow students time to work on their final presentations. Access to an electronic whiteboard could mean that Power Point presentations are the preferred method of delivery, with the documentation they generated being shown before being handed in to the teacher for assessment.
This session will serve as a celebration of the work that the students put in during the unit and will allow them to showcase their new found talents as Forensic Investigators.
Have each group deliver their presentation to the rest of the class. If possible arrange for other year levels or classes to be present so the students can show their work, and explain what they have learned during the unit.
MATERIALS
Students will provide all the materials necessary for their own presentations, but you should have the electronic whiteboard set up, along with a computer or laptop ready to run their presentations. You will also need a copy of the rubric to begin filling out.
EVIDENCE OF LEARNING
After each presentation ensure that each group hands in a folio of their completed work. It should include:
Their plans for the security system and how to breach that of the other team.
A reflection on how well their plans were executed.
A list of the evidence they left behind and the locations it was left.
A list of the evidence recovered at their crime scene.
Documentation of the evidence collection.
A summary of the groups' theories on who left the evidence and their conclusions on who committed the crime.
This will form the basis for the assessment of the rich task, and should be accompanied by a copy of the rubric, a list of team members, and a copy of the presentation (electronic or paper).
CATERING FOR INCLUSION
As there are many different elements to this activity students' will be able to use their prior knowledge to select contributions that will allow them to work to their strengths.
| rich_task_rubric_1.docx |
| rich_task_student_check_list.docx |
EXTENSION LESSON: HOMICIDE INVESTIGATION INSPIRATION
If you consider conducting a murder investigation the following clip could be of interest. We have not however, included one in this unit.
click the following websites of interest for their links
What is Forensic Science This is a seven part series exploring the fantastic world of science.
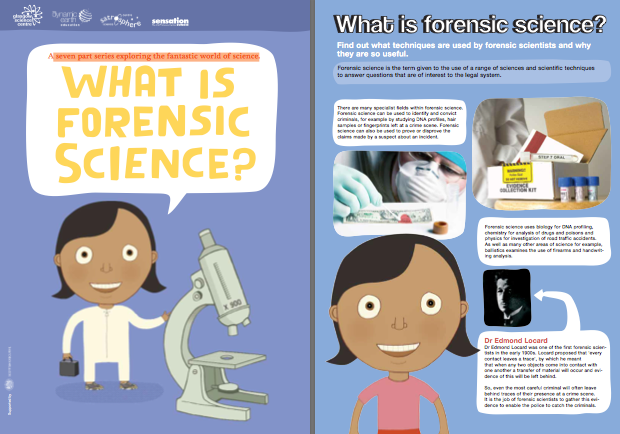
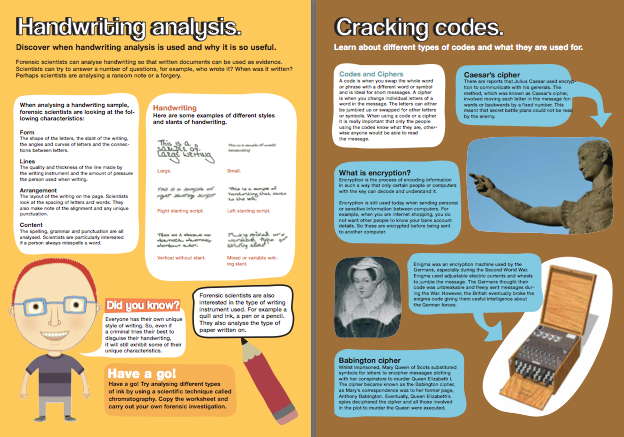
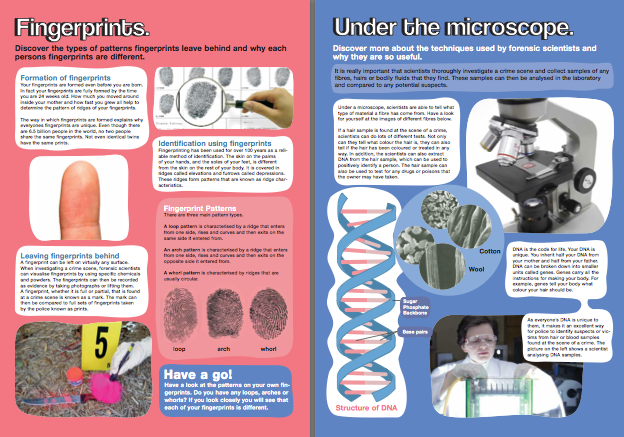
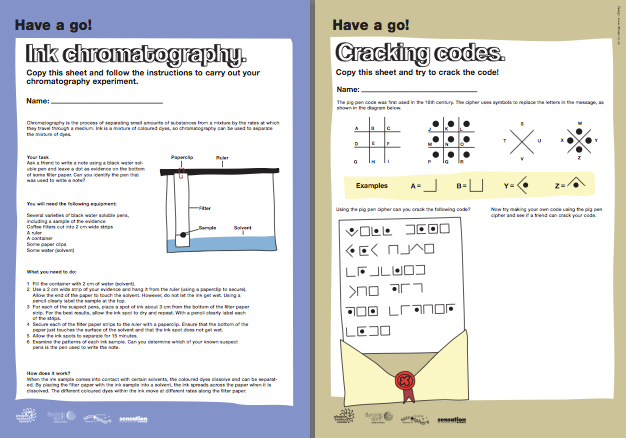
RESOURCES
SPY MUSEUM - SEPTEMBER 11 - THE INTELLIGENCE ANGLE LESSON PLANS
In commemoration of the 10th anniversary of the September 11, 2001 terrorist attacks, the International Spy Museum has created these lesson plans and activities to support student understanding of the role that intelligence played leading up to, during, and following the events of that day. This pivotal event has greatly changed the world in which today’s students live. Examining 9/11 through the lens of intelligence provides students with a critical perspective on this historic event: the actions taken by the government connected to the attacks and the consequences of those actions.
These lesson plans and activities are designed to assist teachers in integrating new 9/11 content into the curriculum as well as to explore the following concepts: the balance of national security and civil liberties; the role that intelligence plays in informing policy decisions; and, domestic legislation stemming from national security threats.
FBI KIDS
HOW TO EXAMINE A CRIME SCENE
CYBERBEE (TURN DOWN YOUR SOUND NOW)
HOW TO MAKE A FORENSIC CRIME SCENE KIT - What Tools Does a Detective Bring to a Crime Scene?
CODES AND CODE BREAKING LESSON
CIPHER WHEEL
OPERATION CODE CRACKER
VICTORIAN POLICE KIDS PAGE
FINGERPRINTING
DNA Extension Lesson Plan
Free Who killed the Iceman Lesson Plan
Free Forensic Detectives: Who Did It? Lesson Plan
Free Writing As Criminal Evidence Lesson Plan
Free Handwriting And Forgery Lesson Plan
Free Forensic Detectives: Mysteries And Solutions Lesson Plan
Free Forensic Detectives: Chemistry At Work Lesson Plan
Free Forensic Detectives: Archaeology At Work Lesson Plan
EXPLAIN THAT STUFF
by Chris Woodford
We all love a good detective story. If we can figure out "whodunit" before the detectives on TV, we feel as smart as Sherlock Holmes! In reality, solving a crime usually takes an awful lot longer than a 60-minute episode of your favorite police drama. Vast amounts of evidence often have to be collected and processed, huge numbers of witnesses may have to be interviewed, and it can take years (sometimes even decades) before the person responsible for a crime is brought to justice. Sherlock Holmes, the famous fictional detective from London's Baker Street, relied on his powers of observation and deduction to solve crimes that baffled the police. But in the real world, it's oftenforensic scientists, working diligently out of the spotlight, who provide the crucial pieces of evidence. How can you use science to solve a crime? Let's take a closer look!
SCHOLASTIC LESSON PLAN ON CRIME SCENE SCIENCE
Teachers who've seen the benefits of using forensics say the subject can be taught responsibly-and produce great results. That's why SCHOLASTIC asked them for their advice in starting or improving a crime-scene class. Here are their tips for turning out a roomful of sleuths-who are thoughtful, investigative scientists, too.
EXTENSION
The following YouTube Clip is about a man who murdered a stranger in order to avoid going to jail for drug trafficing. He was attempting to faked his own death. It is powerful and should be viewed and considered before using in a classroom. The entire story is in three parts and would probably suit being a lesson in itself
In commemoration of the 10th anniversary of the September 11, 2001 terrorist attacks, the International Spy Museum has created these lesson plans and activities to support student understanding of the role that intelligence played leading up to, during, and following the events of that day. This pivotal event has greatly changed the world in which today’s students live. Examining 9/11 through the lens of intelligence provides students with a critical perspective on this historic event: the actions taken by the government connected to the attacks and the consequences of those actions.
These lesson plans and activities are designed to assist teachers in integrating new 9/11 content into the curriculum as well as to explore the following concepts: the balance of national security and civil liberties; the role that intelligence plays in informing policy decisions; and, domestic legislation stemming from national security threats.
FBI KIDS
HOW TO EXAMINE A CRIME SCENE
CYBERBEE (TURN DOWN YOUR SOUND NOW)
HOW TO MAKE A FORENSIC CRIME SCENE KIT - What Tools Does a Detective Bring to a Crime Scene?
CODES AND CODE BREAKING LESSON
CIPHER WHEEL
- www.csiro.au/helix/sciencemail/activities/images/Cipher1.jpg
- www.csiro.au/helix/sciencemail/activities/images/Cipher2.jpg
- www.csiro.au/helix/sciencemail/activities/images/Cipher3.jpg
OPERATION CODE CRACKER
VICTORIAN POLICE KIDS PAGE
FINGERPRINTING
DNA Extension Lesson Plan
Free Who killed the Iceman Lesson Plan
- Subject: Physical Science
- Grade(s): 6-12
- Duration: Two or three class periods
Free Forensic Detectives: Who Did It? Lesson Plan
- Subject: Physical Science
- Grade(s): 6-8
- Duration: Two to three class periods
Free Writing As Criminal Evidence Lesson Plan
- Subject: Physical Science
- Grade(s): 6-8
- Duration: Two class periods
Free Handwriting And Forgery Lesson Plan
- Subject: Physical Science
- Grade(s): 6-8
- Duration: Two class periods
Free Forensic Detectives: Mysteries And Solutions Lesson Plan
- Subject: Physical Science
- Grade(s): 6-8
- Duration: Three class periods
Free Forensic Detectives: Chemistry At Work Lesson Plan
- Subject: Physical Science
- Grade(s): 6-8
- Duration: Four class periods
Free Forensic Detectives: Archaeology At Work Lesson Plan
- Subject: Physical Science
- Grade(s): 6-8
- Duration: Four class periods
EXPLAIN THAT STUFF
by Chris Woodford
We all love a good detective story. If we can figure out "whodunit" before the detectives on TV, we feel as smart as Sherlock Holmes! In reality, solving a crime usually takes an awful lot longer than a 60-minute episode of your favorite police drama. Vast amounts of evidence often have to be collected and processed, huge numbers of witnesses may have to be interviewed, and it can take years (sometimes even decades) before the person responsible for a crime is brought to justice. Sherlock Holmes, the famous fictional detective from London's Baker Street, relied on his powers of observation and deduction to solve crimes that baffled the police. But in the real world, it's oftenforensic scientists, working diligently out of the spotlight, who provide the crucial pieces of evidence. How can you use science to solve a crime? Let's take a closer look!
SCHOLASTIC LESSON PLAN ON CRIME SCENE SCIENCE
Teachers who've seen the benefits of using forensics say the subject can be taught responsibly-and produce great results. That's why SCHOLASTIC asked them for their advice in starting or improving a crime-scene class. Here are their tips for turning out a roomful of sleuths-who are thoughtful, investigative scientists, too.
EXTENSION
The following YouTube Clip is about a man who murdered a stranger in order to avoid going to jail for drug trafficing. He was attempting to faked his own death. It is powerful and should be viewed and considered before using in a classroom. The entire story is in three parts and would probably suit being a lesson in itself

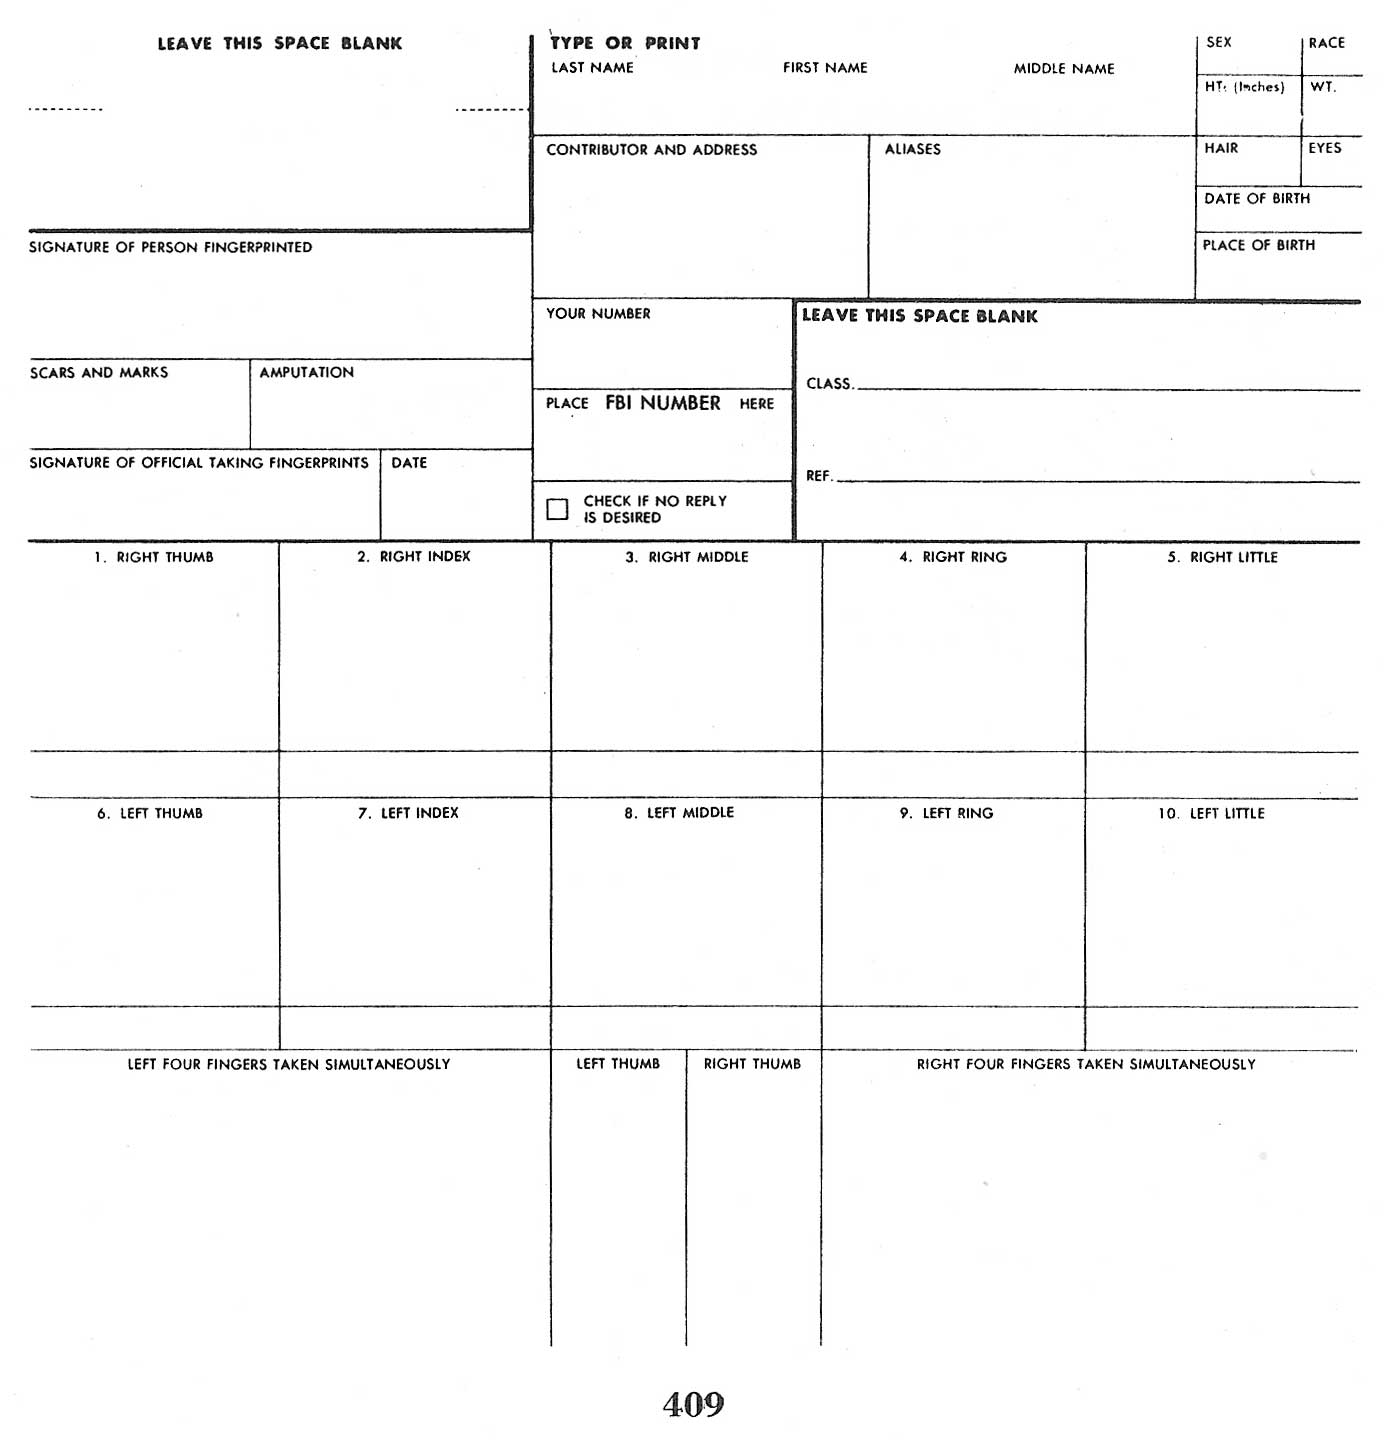
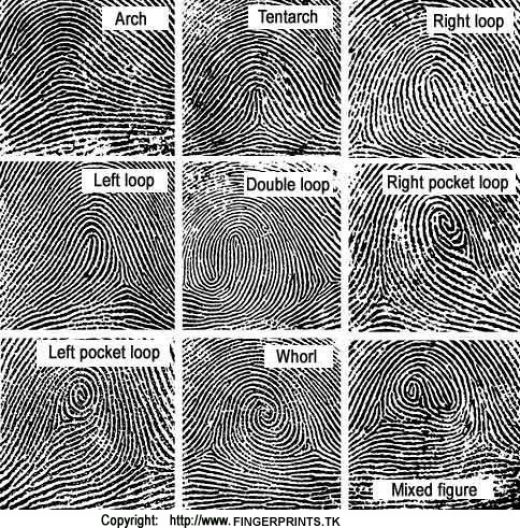